


Table of Contents
ToggleAuthor: SmileBottles Editorial Team
Estimated Reading Time: About 17 Minutes
If you are purchasing glass packaging for your business, getting the details exactly right is not just a suggestion; it is a necessity. Whether you are launching a new beverage, packaging cosmetics, or bottling a premium spirit, understanding glass bottle dimensions is the key to a smooth production process. A difference of just a millimeter can mean the difference between a cap that seals perfectly and a bottle that leaks during shipping.
This comprehensive guide is designed to walk you through exactly how to measure your glass packaging. Smilebottles will explore the anatomy of the bottle, the tools you need, standard tolerances, and expert tips directly from the production floor. By the end of this article, you will know exactly how to measure bottle size with confidence, ensuring your next bulk order fits your exact needs.
Introduction: Why Accurate Glass Bottle Measurement Matters
When you order in bulk, you are making a significant investment. Accurate measurement protects that investment. Here is why taking the time to understand your bottle dimensions is so critical:
Closure Compatibility: The cap, cork, or pump must fit the bottle mouth perfectly. If the neck finish is measured incorrectly, the closure will either not screw on, or it will be too loose to provide a safe seal.
Labeling and Branding: Automated labeling machines require precise panel heights and body diameters. If your bottle body has a slight, unexpected taper, your labels will bubble or apply crookedly.
Secondary Packaging: Your glass bottles need to fit securely into cardboard dividers, master cartons, and retail display boxes. Accurate height and base dimensions prevent rattling and breakage during transit.
Manufacturing Consistency: Knowing how to measure helps you perform quality control checks when your shipment arrives, ensuring the factory met your agreed-upon tolerances.
Whether you are an importer, a brand owner, or a product designer, mastering these measurements will save you time, money, and endless frustration.

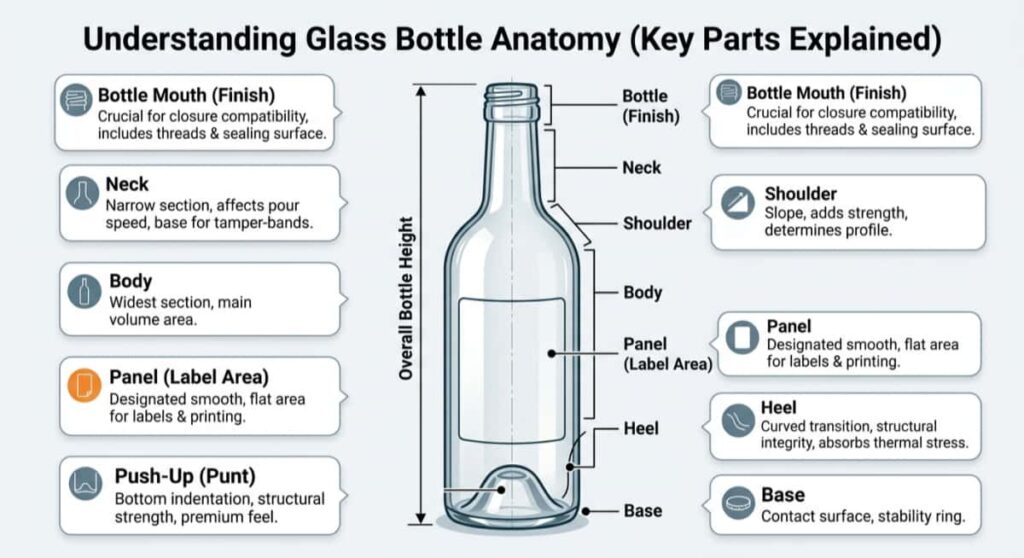
Understanding Glass Bottle Anatomy (Key Parts Explained)
Before you can measure anything accurately, you need to speak the language of packaging. A bottle is not just a single piece of glass; it is made up of distinct sections, each engineered for a specific purpose. Understanding the parts of a glass bottle is your first step toward accurate measurement.
Let’s break down the essential bottle parts from top to bottom.
Bottle Mouth (Finish)
The very top of the bottle is called the finish. The term “finish” comes from the historical glass bottle manufacturing process, where the top of the bottle was the last part “finished” by the glassblower. Today, the finish refers to the entire upper section that holds the closure. It includes the threads, the sealing surface (the flat top edge where the cap liner sits), and the transfer bead. Getting the finish dimensions right is the single most important factor for closure compatibility.
Neck
Right below the finish is the neck. The neck is the narrowest part of the bottle and serves as a funnel to help liquids pour smoothly. The shape and length of the neck can drastically alter the pouring speed and the overall visual profile of your packaging. When learning how to measure bottle neck size, you are not just looking at the opening; you are evaluating how a tamper-evident band or shrink capsule will sit on the glass.
Shoulder
The shoulder is the sloping transition area where the narrow neck widens out to meet the main body of the bottle. Shoulders can be steep and abrupt (like a classic Boston Round) or gentle and sloping (like a Burgundy wine bottle). The angle of the shoulder affects the structural strength of the bottle and dictates how evenly pressure is distributed inside.
Body
The body is the main volume-holding area. It is the widest and most prominent section among all the parts of the bottle. When you are looking at the body, you are evaluating the primary space where your product will live. The body must be manufactured with consistent glass thickness to prevent weak spots.
Panel (Label Area)
Within the body is the panel, also known as the label area. This is a designated, perfectly flat and smooth section specifically designed for your branding. If you are applying wrap-around labels or silk-screen printing, measuring the exact height and circumference of the panel is vital to ensure your artwork fits without distortion.
Heel
The heel is the lower curved section where the straight vertical lines of the body transition into the horizontal plane of the base. This is a critical structural point. During the manufacturing process, the heel experiences significant thermal stress. A well-designed heel ensures the bottle can withstand impact if it is dropped or bumped on a table.
Push-Up (Punt)
If you turn a wine or spirits bottle upside down, you will often notice a deep indentation in the bottom. This is called the push-up, or the punt. Originally, punts were created to ensure the bottom of a hand-blown bottle did not bulge outward, which would cause the bottle to wobble. Today, the push-up provides structural integrity, helping the bottle withstand internal pressure (especially for carbonated drinks like Champagne), and creates an illusion of a larger, heavier, and more premium product.
Base
The base is the flat ring at the very bottom of the bottle that makes direct contact with the table or shelf. This is the foundation of the bottle. The wider the base, the more stable the bottle. You will often see a textured pattern (called knurling or stippling) on the base; this helps mask minor scratches from the production line and improves stability on conveyor belts.
Overall Bottle Height
This is the straight vertical distance from the bottom of the base to the highest point of the finish. Knowing the overall height is non-negotiable for configuring the shelves on your warehouse racks and sizing your shipping cartons
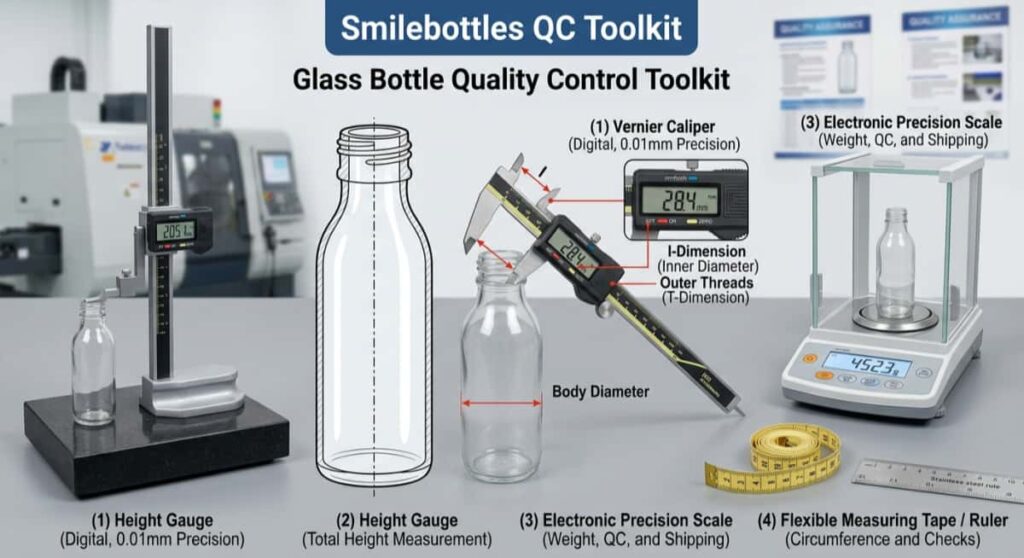
Essential Tools for Measuring Glass Bottles
You cannot rely on a standard school ruler if you want professional results. To gather accurate bottle measurements, you must use industry-standard tools. Here is what you need in your quality control toolkit.
Vernier Caliper (Most Important Tool)
If you only buy one tool for measuring bottles, make it a digital Vernier caliper. A high-quality caliper allows you to measure with precision down to a fraction of a millimeter. You will use the primary, larger jaws to measure the outer diameter of the body, base, and neck. You will use the smaller, upper jaws to measure the inner diameter of the bottle mouth. A caliper is absolutely essential for verifying thread sizes and ensuring your caps will fit tightly.
Height Gauge
While a caliper is great for width, measuring the exact total height of a bottle can be tricky if the bottle has a curved top. A height gauge solves this. You place the bottle on a perfectly flat surface (like a granite surface plate), lower the horizontal arm of the gauge until it rests flat against the top of the bottle finish, and read the exact height. This ensures vertical precision without the angle errors that occur when eyeballing a ruler.
Electronic Precision Scale
Glass distribution is never 100% perfect, but the weight of the bottle tells you a lot about its quality and internal volume. An electronic precision scale is used to measure the empty weight of the bottle. If your bottles are significantly lighter than the specification sheet dictates, the glass walls may be too thin, increasing the risk of breakage. Knowing the exact weight is also necessary for calculating your freight shipping costs.
Measuring Tape / Ruler (Optional but Useful)
While you should not use a standard ruler for precise finish measurements, a soft, flexible measuring tape (like a tailor’s tape) is incredibly useful. You can wrap it around the body of the bottle to quickly find the circumference, which is highly beneficial when you are passing dimensions to your label printer. A straight steel ruler is also handy for quick, visual checks of the label panel height.
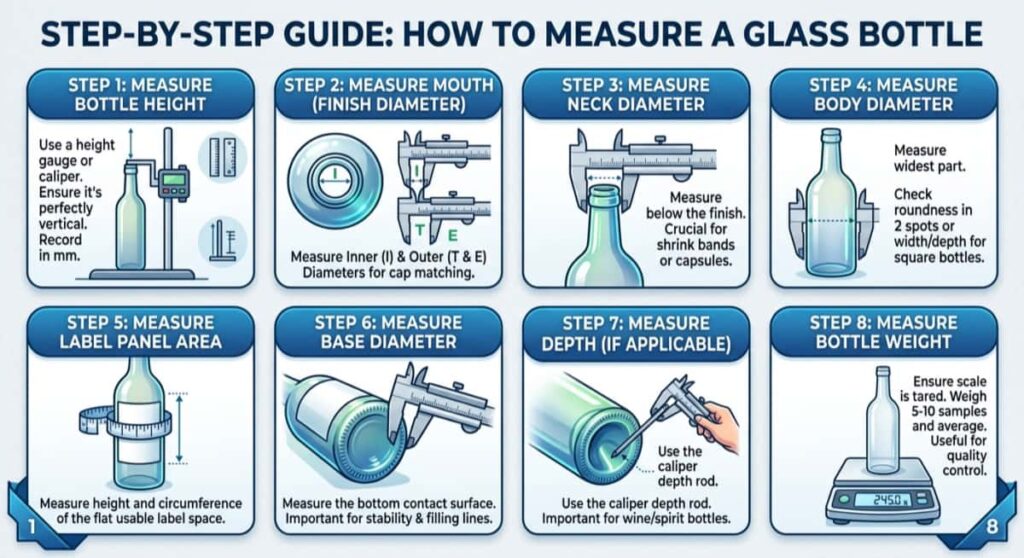
Step-by-Step Guide: How to Measure a Glass Bottle
Now that you understand the anatomy and have your tools ready, let’s dive into the practical process. Follow these eight steps to document your exact glass bottle specifications.
Step 1 – Measure Bottle Height
Place your bottle on a completely flat, level surface. If you have a height gauge, lower the arm until it touches the very top edge of the bottle mouth. If you are using a caliper, open the jaws wide enough to span the distance from the base to the top of the finish. Make sure the caliper is perfectly vertical and not leaning at an angle, as an angle will give you a falsely elongated measurement. Record this number in millimeters.
Step 2 – Measure Mouth (Finish Diameter)
This is the most critical step for cap matching. You need to measure two things here. First, use the inside jaws of your digital caliper to measure the “I” dimension (Inner Diameter) of the bottle opening. This determines if a cork, dropper, or pump tube will fit inside. Next, use the outside jaws to measure the outer diameter across the threads (the “T” dimension) and the diameter across the neck just below the threads (the “E” dimension). These exact numbers dictate what size screw cap you need.
Step 3 – Measure Neck Diameter
Move your caliper just below the finish to the narrowest part of the neck. Gently close the jaws until they touch the glass. Do not squeeze the caliper too tightly, as glass is rigid and you only need a surface-level touch for an accurate reading. This measurement is vital if you plan to apply a shrink band or a decorative foil capsule over the closure.
Step 4 – Measure Body Diameter
Find the widest part of the bottle’s main body. Open your caliper jaws and slide them over the body. If your bottle is cylindrical, measure it in two different spots (rotating the bottle 90 degrees) to ensure the bottle is perfectly round and not slightly oval-shaped. If you have a square or rectangular bottle, measure both the width and the depth.
Step 5 – Measure Label Panel Area
To measure the label panel height, use your caliper to find the distance between the top curve (where the shoulder begins) and the bottom curve (where the heel begins). This flat, vertical space is your maximum label height. Next, use your flexible measuring tape to wrap around the circumference of this flat area. Your label design should be slightly smaller than these maximum dimensions to prevent wrinkling on the curves.
Step 6 – Measure Base Diameter
Place your caliper at the very bottom of the bottle, across the widest part of the base that touches the table. The base diameter is important for your filling line. Automated conveyor belts use rails to keep bottles moving smoothly; if your base measurement is too wide or too narrow, the bottles will jam or tip over during the filling process.
Step 7 – Measure Push-Up Depth (If Applicable)
If your bottle has a punt, you need to measure its depth. Use the depth rod (the thin metal stick that protrudes from the bottom of a caliper when you open it). Rest the flat bottom edge of the caliper across the base of the bottle, and push the depth rod down until it touches the highest internal point of the punt. This measurement is crucial because a deeper push-up displaces more liquid, meaning the bottle needs to be taller or wider to hold the same volume.
Step 8 – Measure Bottle Weight
Turn on your electronic precision scale and ensure it is zeroed out (tared). Place the completely empty, dry glass bottle in the center of the scale. Record the weight in grams. Because glass molding has slight variations, weigh at least five to ten different sample bottles and calculate the average weight.
Common Measurement Standards & Units
When discussing specifications with a glass bottle factory, it is essential to speak the same numerical language.
Millimeters vs. Inches: In the commercial packaging industry, millimeters (mm) are the gold standard. Even if you operate in the United States, you should default to the metric system for packaging. Millimeters offer a finer degree of precision without relying on complex fractions. Always provide your measurements in mm to avoid miscommunications with overseas suppliers.
Standard Neck Finishes: The industry relies on standardized thread profiles established by organizations like the Glass Packaging Institute (GPI). You will frequently see finish sizes written as two numbers, such as “28-400”. The first number (28) refers to the outer diameter of the threads in millimeters. The second number (400) refers to the thread style, height, and number of turns. Knowing these standard bottle sizes makes sourcing caps incredibly easy, as a 28-400 cap from any supplier will generally fit a 28-400 bottle finish.
Manufacturing Tolerances: Glass is a molten liquid that cools and solidifies, meaning it shrinks slightly. Because of this, no two bottles are exactly identical down to the microscopic level. Every measurement comes with an acceptable “tolerance”—a small +/- allowance. For example, a bottle’s overall height might have a tolerance of +/- 1.5mm. When reviewing specifications, always look at the tolerance ranges to ensure your packaging machinery can handle these slight variations.
Common Mistakes When Measuring Glass Bottles
Even experienced buyers can make errors when documenting the parts of a bottle. Here are the most common pitfalls to avoid:
Measuring Uneven Surfaces: One of the biggest mistakes is trying to measure the label panel on the curved shoulder or heel. If you include the curve in your flat label dimensions, your labels will crease and look unprofessional on the shelf.
Ignoring Tolerances: Designing a custom cardboard box to fit exactly one specific bottle sample without leaving room for the +/- tolerance will result in a percentage of your bulk order simply not fitting in the boxes. Always design secondary packaging around the maximum tolerance size.
Using Incorrect Tools: Relying on a school ruler to measure the inner diameter of the bottle mouth is a guaranteed way to order the wrong size cork. Always use a calibrated digital caliper for precision.
Confusing Inner vs. Outer Diameter: When a cap supplier asks for the neck size, they usually want the outer thread diameter. If you mistakenly give them the inner diameter of the mouth opening, you will receive closures that are far too small. Always clarify which specific dimension is being requested.
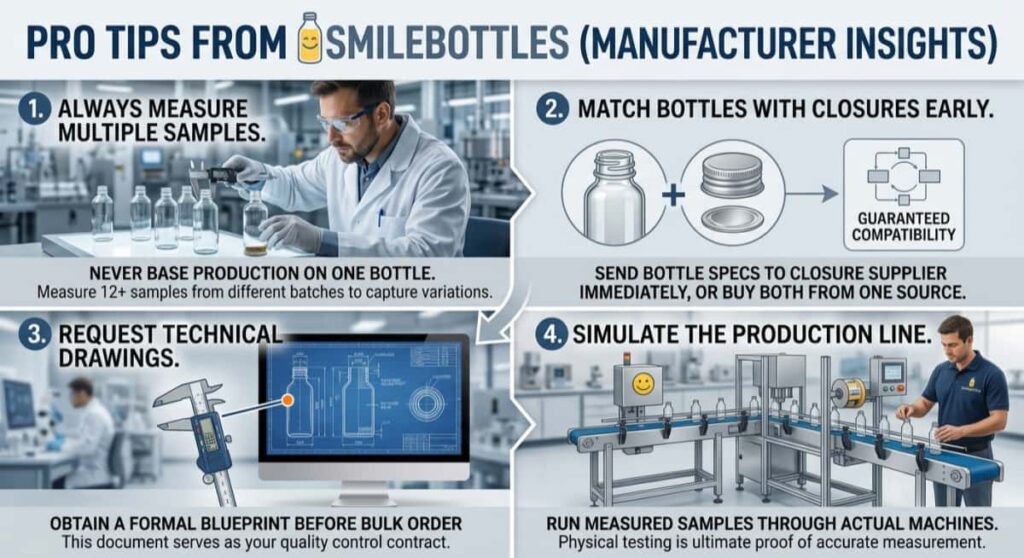
Pro Tips from Smilebottles (Manufacturer Insights)
As an experienced glass bottle manufacturer, we have seen it all. To ensure your purchasing process is absolutely seamless, we recommend adopting these professional habits:
Always Measure Multiple Samples: Never base your entire production run on the measurements of a single bottle. Mold variations happen. Measure at least a dozen samples from different production batches to understand the average size and the extremes of the variance.
Match Bottles with Closures Early: Do not wait until your bottles are manufactured to start looking for caps. Send your bottle specification sheet to your closure supplier immediately, or better yet, buy your bottles and closures from the same source to guarantee compatibility.
Request Technical Drawings: Before placing a bulk order, ask your factory for a formal blueprint or technical drawing. This document will map out every dimension and tolerance clearly, serving as your contract for quality control.
Simulate the Production Line: If possible, take a few measured samples and run them through your actual filling and labeling machines before authorizing a massive order. Physical testing is the ultimate proof of accurate measurement.
Why Choose Smilebottles for Your Glass Bottle Needs
When you are investing heavily in packaging, you need a partner who understands the microscopic details. At Smilebottles, we are more than just a supplier; we are your dedicated manufacturing partner.
We pride ourselves on our deep manufacturing expertise, ensuring that every batch of glass we produce adheres to the strictest global tolerances. Whether you are looking for standard, ready-to-ship designs or require custom mold creation for a unique brand identity, our engineering team provides flawless technical drawings to guarantee your closures and labels fit perfectly.
Our rigorous quality control standards mean that the measurements you approve on day one are the exact measurements you receive in your warehouse. With extensive global export experience, we understand how to package and ship glass safely, ensuring your inventory arrives intact and ready for the filling line. Let us handle the complex math of glass manufacturing so you can focus on building your brand.
FAQ Frequently Asked Questions About Glass Bottle Dimensions
Q1:What is the standard size of a glass bottle?
A1:There is no single “standard” size, as it depends heavily on the industry. However, there are common capacities. For wine, the standard size is 750ml. For beer, it is typically 330ml or 12oz. Essential oils are frequently used in 10ml, 15ml, or 30ml standard dropper bottles. While capacities are standard, the external dimensions can vary widely based on the specific shape and weight of the glass.
Q2:How do I measure bottle neck size correctly?
A2:To find the correct cap size, use a digital caliper to measure the outer diameter of the bottle’s finish, directly across the widest part of the threads. Record this in millimeters. You also need to measure the height of the finish to ensure your cap has the correct depth to seal securely against the top lip of the glass.
Q3:What is the most important bottle dimension?
A3:While all dimensions matter, the neck finish (the “T” and “E” dimensions) is the most critical. If the body is a millimeter too wide, it might just be a tight squeeze in a box. If the finish is a millimeter too wide, your caps will not screw on, rendering the entire bottle completely useless for your product.
Q4:What tools are best for accurate measurement?
A4:A digital Vernier caliper is the absolute best tool for measuring widths, thread sizes, and inner diameters. A height gauge on a flat surface plate is best for total height, and an electronic scale is necessary for measuring weight. Always use metric tools for industry-standard accuracy.
Q5:How precise should bottle measurements be?
A5:When recording your dimensions, you should document them to the first decimal point in millimeters (e.g., 28.4mm). However, understand that manufacturing tolerances will usually allow for a +/- 0.5mm to +/- 1.5mm variation depending on the size and weight of the bottle.
Conclusion
Understanding exactly how to measure your packaging is one of the most vital skills for any bulk buyer. By familiarizing yourself with the anatomical parts of the glass, investing in the right tools like digital calipers, and rigorously following a step-by-step measurement process, you eliminate the guesswork from your supply chain. Accurate measurements prevent costly delays, ensure your closures seal perfectly, and keep your labeling lines running at maximum efficiency.
We encourage you to use this guide as a permanent reference for your quality control team. Always double-check your tolerances, measure multiple samples, and rely on technical blueprints. If you are ready to source high-quality, precision-engineered glass packaging, reach out to the team at Smilebottles.


